

How to Light Videos
We tackled the concept of composition in our last post, breaking down everything from the rule of thirds to lines of action.
Over the next few posts we’ll continue to break down basic design principals and tech solutions:
Basic composition and design
Easy lighting that works every time
Branding and visual language
Tweak your settings, a few simple camera tricks
Sound (arguably the most important)
Details that matter
In this post we’ll explore the second principal, lighting.
First, why is light important for videos?
Cameras capture light. Without going into too much technical detail, cameras operate on allowing a certain amount of light into the lens. You can control this light one of two ways. Either you can adjust your camera settings or you can alter the light in your environment.
Camera settings.
Cell phones are limited with how many settings control light. Most smart phones have HDR built into them (high dynamic range). This allows for a broad range of detail in both the shadows and highlights. This can result in grainy shadows if it is pushed too far.
Check your exposure settings on you camera app to explore what options are at your disposal. This article from apple breaks down these iPhone settings in detail (or look up your device manufacturer’s specific settings).
I’m sure there are also third party apps that give you access to more in depth features for your phone.
For DSLRs or Mirrorless cameras things get a bit more complex when altering settings.
There are a few settings that control light in your camera, and they do so in slightly diffent ways.
Aperture (f/stop)
Aperture is the hole that allows light into your camera or phone’s lens.
We can control the size of the hole by increasing or decreasing our f/stop.
A low f/stop, like f1.8, lets in a lot of light and creates a very shallow depth of field. This creates dreamy, blurred backgrounds, drawing attention to and sharpening the subject. Be careful not to default to this all the time as it is difficult to keep focus, especially when your subject is close to the camera.
A high f/stop, like f22, lets in very little light and increases the depth of field. This is used when you want to keep everything in the scene in detail. In a low light setting it can be difficult to increase your aperture without adding lights to your scene.
Shutter Speed
Your camera’s shutter should be informed by your frame rate. Frame rate is how many frames per second (fps) your camera captures. Your Shutter speed should always be at least double your frame rate to get realistic motion blur and avoid warping. There are a lot of technical reasons for this, explained by the 180 degree rule. This article explains it well (and better than I could).
One of the traps that is easy to fall into is adjusting your shutter speed to let in more or less light without considering the result to your image. Because most cameras have what’s called a rolling shutter, be sure to always check your settings to avoid banding from flickering lights. When possible, avoid fluorescent bulbs that flicker altogether.
ISO
Aperture and Shutter control how much light gets into your camera while ISO alters your camera’s light sensitivity digitally.
Setting ISO too high (to brighten the image) introduces noise and lowers color accuracy.
Setting your ISO below 800 for most modern cameras typically produces a clean image, free from excess noise. Some cameras have dual native ISO which allows you to set a high ISO and keep a clear image. Higher ISO is not necessarily bad as long as you check your image for excessive noise and it looks clear.
Be sure to check your image on a larger screen to be sure you have a clean image. External monitors are a great and relatively affordable mans to do this. You can also hook most cameras to an iPad, phone or laptop via HDMI or USBc to view the image larger.
There are a few different rules to add light or augment the light in your scene.
Rule #1: Find your light source
No matter where you are in the world, there is a source of light. Whether it’s the sun, moon, interior lights, street lights or a nearby lamp.
The goal of any filmmaker or videographer should be to shape light. Much like painting, the artist’s job is to tell a story and light is one of your actors.
Consider the purpose of your video when settling on a light source. A soft window light may not fit your dramatic testimony video. That harsh sunlight may distract from your corporate training video.
Find your light source and figure out where to place your subject in your scene to get the most out of your available light.
If you don’t have enough light, then consider reading on to see what your options are for adding light to your scene.
Practicals. These are smaller lights in your scene whose sole purpose it to add interest to your frame, not necessarily to light your subject.
Rule #2: Motivate the light
Treat your lighting as if it is an actor with it’s own motivation.
The point is to use what light is at your disposal and shape it by adding or taking away that existing light.
If you are relying on the sun to light your subject, try to avoid direct sunlight as it creates harsh, unflattering shadows on the face. Instead, try to find a shaded area or diffuse the light with a simple white sheet or similar material by placing it between the light and your subject.
Example: The nearby window wants to shed light in the room, your job is to control that light and shape it.
• If the light is naturally soft and diffused, that may mean you place your subject near the window, allowing the soft light to wrap around their face.
• If the light is coming through the window harshly, casting harsh shadows, then maybe you can use that light as a point of interest in your background or backlight your subject with it, creating a rim light for a moody and dramatic look.
• You can put a white sheet over the window and diffuse the light.
• Be careful using natural light for videos as the light will shift based on cloud cover and time of day. When you can, control your light as much as possible.
Consider using an app like Sun Seeker to track the sun and see where the light is going to be when you record.
Rule #3: Only add the light you need
It is easy to add a lot of light on your subject to get the lowest aperture possible, and sometimes that’s what you need to do, but consider the entire scene, not just your subject when lighting.
Build off of compositional elements within your scene and add/take away light based on what makes sense for the scene as a whole.
Rule #4: Color temperature
Doing a little bit of research on color temperature goes a long way towards using light to help tell your story.
Color exists on a spectrum (you are probably familiar with ROYGBIV, the rainbow colors). Sunlight appears white because it is a combination of these colors. When we talk about light in video we typically refer to Kelvin as a way to measure that color temperature.
Neutral sunlight is right around 5000K, with warm light going towards 1000K- and cold light going up towards 8000K+.
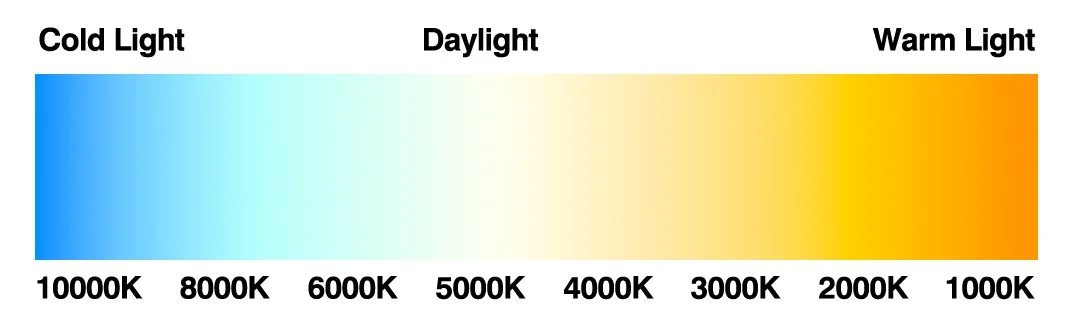
Color temperature scale.
The use of color temperature can affect the mood of your video greatly. And conflicting temperatures can clash if not handled correctly. Try balancing color temperature in your scene by, again, motivating the light.
A fire lit scene will be around 3000-1500K, but you may have moonlight coming from above and behind, spilling cooler light across the background, which would be around 7500-10000K (depending on how dramatic and surreal you want your lighting to be these numbers can be modified).
The goal is to always be considering how the light will make your viewers feel. Fond flashback scenes are likely going to be shot using warmer light, while dramatic and traumatizing flashbacks would be filmed in a cold light. Let the tone and emotion of your video/scene determine the temperature of the light.
This is a lot of high brow, technical information. The crux of the matter is that we should consider the light and if needed, add the appropriate lights to our scenes.
Lights for your budget
The following links are Amazon affiliate links.
The Godox SL60IIBi is a great choice for someone looking to play around with color temperature for creative filmmaking. It requires additional equipment like stands and umbrellas and it is probably a bit overkill for someone looking to simply add enough light so they’re videos look better.
For a basic and affordable option we would recommend the Nanlite Pico Portable. It is a small but great light to simply brighten your image, especially if you’re filming on your phone camera.
Pavo tubes are also another great option and are versatile when it comes to setup and tear down.
These are affordable options, but if you’re looking for more control and power, then just about any modern light on the market will do the job, though some provide more bells and whistles than others.
Just remember that continuous LED lights are made for video, while strobe lights are made for photography. You can also explore fresnels and spotlights, but they definitely require a bit more experience to control the lights.
Accessories and filters
Master filmmakers often have entire trucks full of accessories at their disposal, but sometimes they only need a few key items.
I like to carry around a few simple color filters or gels that allow me to color the light even further than my Godox lights will allow. I will often add a blue filter over a 6500K light to make it appear more like 8500K. You can also stack filters to achieve more results.
I use the filters included in my Godox lights. Just ensure that whatever filter you use is rated for the heat coming off of your lights.
Sometimes I will find a colored material (cloth, plastic, etc) and clamp it in front of my light to get a color cast on the scene.
You can also use adapters like a Gobo projector with a bowens mount. These use metal discs that slide in front of your light to cast creative shadows or colored filters.
I achieve a similar look and feel by poking a random pattern in a piece of cardboard and taping it to my lights. All this does is give you an interesting scattered light effect that mimics light coming through trees from a window.
I typically always try to consider the free option first when looking at purchasing a tool for a very specific purpose. Sometimes it has been worth it, but there is nothing worse than buying a $100 tool and finding yourself preferring the free option.
We’ve covered a ton of material on lighting and there is a plethora of info still out there to consider. The most important thing is to make sure that you have the appropriate lighting for your scene and subject.
If you’re just looking at making social media content, quality doesn’t matter nearly as much as the content. But if you have bad lighting it could hurt your views and engagement, leaving a poor impression.
Try out some of these things we talked about before buying any major lighting equipment. All of these things mentioned can be implemented with a cell phone and natural light.
Looking to expand your knowledge beyond the blog?
Book a free consultation with us today to discuss how Booth42 can help you bring your vision to life.